Connect to Your VPS Using PuTTY
After launching PuTTY, you're ready to connect to your VPS. Follow these steps:
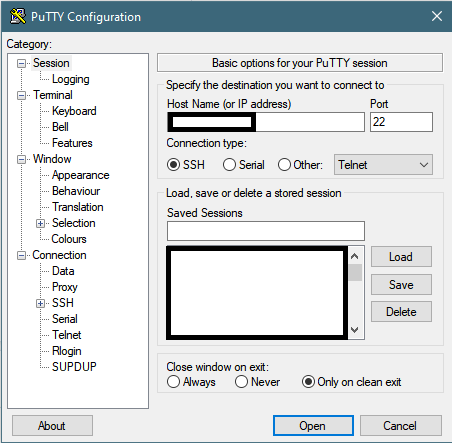
Host Name: Enter the IP address of your VPS in the 'Host Name (or IP address)' field.
Port: Leave the 'Port' field as 22, which is the default port for SSH connections.
Connection Type: Make sure 'SSH' is selected as the connection type.
Save Session: If you want, you can save this configuration for future use so you won't have to fill in the IP address again. To do this, enter a name for this session in the 'Saved Sessions' field and click 'Save'.
Open Connection: Finally, click on the 'Open' button to establish the connection.
Please refer to the image below for a visual guide on these steps:

After clicking 'Open', a terminal window should appear. This is where you will enter your login credentials to access your VPS.
Username: When prompted for the username, enter it. The default username for most systems is 'root'.
Password: After entering the username, you'll be prompted for your password. Enter the password you set when you created your VPS.
When you type the password, no characters will appear in the terminal window. This is a security feature to prevent anyone from seeing your password as you type it.
Also note that you can't use the right-click function to paste the password. Instead, simply right-click your mouse once to paste the password and then press the 'Enter' key.
Congratulations! You are now connected to your VPS!
In the next steps, we will walk you through how to install everything to mint with your VPS !
Last updated